Setting up a swap file on KNULLI firmware can help improve performance on retro gaming consoles (Anbernic RG28xx / RG35xx Plus | H | 2024 | SP) by increasing available memory. This guide walks through the steps needed to create and configure a swap file, ensuring smoother gameplay and better system stability.
Installing a Swap File (SWAP) on KNULLI Firmware (For Retro Gaming Consoles: Anbernic RG28xx / RG35xx Plus | H | 2024 | SP)
Important!
All actions you take are at your own risk. There is a possibility that your SD card’s lifespan may be reduced when using a swap file.
Why Is This Necessary?
After installing the KNULLI firmware, the available RAM is roughly 280-300 MB, which is quite limited for PortMaster, causing games to freeze or automatically close. Adding a swap file can help alleviate these issues.
Preliminary Steps
- Your console must have KNULLI firmware installed.
- Your console must be connected via WiFi and be on the same network as your computer.
Connecting via SSH
Open the command prompt on your computer and enter the following command, replacing ip_address_of_your_console with the actual IP address of your console, which can be found in the WiFi settings:
ssh root@ip_address_of_your_consoleFor example:
ssh root@192.168.1.103Press Enter and then enter the password: linux (When typing the password in the command line window, nothing will be displayed. Just type the password and press Enter.)
Setting Up the Swap File (SWAP)
Run the following commands one by one, pressing Enter after each:
cd /
fallocate -l 1G /media/SHARE/system/swap
chmod 600 /media/SHARE/system/swap
mkswap /media/SHARE/system/swap
swapon /media/SHARE/system/swap
Check if the Swap File is Working:
Use this command:
swapon -sThe output should look something like this:

Making the Swap File Auto-Start
We need to ensure the swap file starts automatically after the console is powered on. Instead of editing /etc/fstab, which wouldn’t work here, we’ll use a different approach that has its own drawbacks, which we’ll discuss later.
Run the following command to open the nano text editor with the path to the new file:
nano /media/SHARE/system/swap.shThen, insert these lines:
#!/bin/bash
swapon /media/SHARE/system/swap
Next, press Ctrl+X, then Y, and then Enter to save and exit.
Now, we need to grant execute permissions to our script:
chmod 777 /media/SHARE/system/swap.shAfter that, run:
nano /media/SHARE/system/batocera.confScroll to the bottom and add the following lines:
global.bootgame.cmd=emulatorlauncher %CONTROLLERSCONFIG% -system ports -rom /media/SHARE/system/swap.sh
global.bootgame.path=/media/SHARE/system/swap.sh
For example:
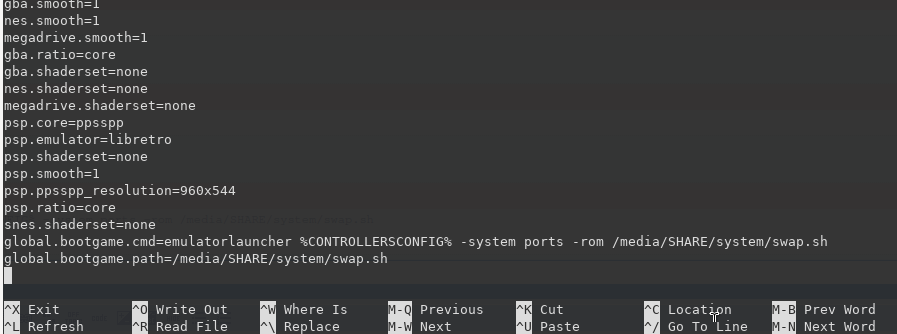
Again, press Ctrl+X, then Y, and then Enter to save and exit.
That’s it!
Your console now has a swap file, and it should automatically activate after a reboot.
Disadvantages
- If you set up the console to auto-launch a game upon startup, the swap file won’t activate automatically anymore. You will need to re-enter the last set of commands to fix this.
- The console’s startup time will increase by approximately 2-3 seconds.